

Algoma Public Health


Class 4 - Septic Tank and Leaching Bed


If you would like to learn more please call the Environmental Health team at 705-759-5286.
STEP 1: Fill out an application
Design Calculations
- Calculate the Total Daily Design Sewage Flow, or "Q", expressed in Litres.
- Calculate the minimum size of septic tank required, expressed in Litres. If pumping raw sewage or effluent is required, indicate the size of the pump chamber.
- Choose type of bed, effluent distribution, absorption trenches OR filter bed, and calculate pipe length/contact area required, expressed in linear metres or square metres.
Algoma Public Health only issues permits for sewage systems of less than 10,000 Litres of daily design sewage flow (Q); if your system design is larger than 10,000 Litres contact the Ministry of Environment.
Site Plan / Design Drawings
Draw a site plan to scale with key measurements, include:
- Property boundaries including lot lines, easements, right-of-ways, access routes, adjacent roads and water bodies (including streams, ponds and lakes), etc.
- Existing and proposed site installations including buildings, septic installations, sheds, wells, power lines, site services (above and below ground), driveways, fences, etc.
- Drainage characteristics of the site, including slopes, ditches, swales, bedrock, outcrops, etc. Include specific identification of areas susceptible to flooding.
- Mandatory measurements to be included:
- Set-backs from the proposed septic system to existing/proposed structures/features (see chart)
- Dimensions of the proposed leaching bed, including contact area (mantle) if required.
Provide Section and Detail Drawings for key features:
- Cross sections will illustrate all the materials that make up the septic system, leaching bed, filter medium and contact area (mantle). Show proposed grade of the septic system, including original grade and final grade.
- Cross sections shall include the depth of the excavation, rock or water table, and soil type (native and imported), depth of materials to be used, and components including pump chamber, septic tank, and distribution piping.
- Adequate information on a top elevation showing tank location, pump chamber (if required), bed size showing the number of runs and spacing of piping and locations of distribution box.
While the "Design Layout On-Site Sewage Systems and Building Permits" form provides areas for these drawings, space is limited. Consider submitting additional pages with more detailed drawings to be able to provide all the required information. The drawings must clearly indicate the above information or your application may be returned to you for clarification and/or revision.
STEP 2: Submit the Application
Submit completed application package with payment of the appropriate fee (see fee schedule). Be sure to include the accurate property information, including Roll number, Lot/Concession Numbers, property owner information, etc.
Once a complete application has been received with all required fees paid in full, an inspector will be in contact with the owner or authorized agent within 10 business days to arrange a date/time for an "Initial Site Inspection".
Any incomplete applications received will be returned to the applicant for completion and delay the turnaround time for application processing.
STEP 3: Initial Site Inspection/Issuance of Building Permit
At the initial site inspection, dig an inspection pit 1 to 2 metres deep where you plan to put your absorption trenches/field bed. Make sure you know where lot lines are located. Up-to-date surveys, or reliable survey stakes are preferred.
The inspector will visit your site to discuss your application and let you know if any further information or requirements are necessary. If the site conditions, application and proposed installation meet the minimum requirements of the Ontario Building Code (OBC), you will receive a Building Permit.
If further information is required, or changes to the plan must be made to meet OBC requirements, you must re-submit these items before a permit can be issued. You MAY NOT begin construction until Building Permit has been issued.
STEP 4: Install the System
Install your septic system as per the application. If you run into unexpected issues during construction that require you to change your plans, you must notifiy your inspector immediately. You may be required to re-submit portions of your application to reflect required changes.
STEP 5: Substantial Components Inspection
Once the system is installed but before you cover it over, call your inspector for a "Substantial Components Inspection". The inspector will arrange to visit the site within 5 business days and check that the system meets OBC requirements. If the installation meets the minimum requirements you will receive notification allowing you to cover and begin using the system, along with any final requirements to complete the installation.
If there is a problem identified with the installation of the system you will be required at this point to fix/change design features. You MAY NOT cover or begin use of the system or affected components until the inspector indicates you may do so. Another inspection may be required before you will be allowed to cover.
STEP 6: Complete the System
Complete the installation according to your application, including final grading and seeding/sodding. You will be provided with a Final Notice of Completion form that must be completed and returned to your inspector once the system is completed.
STEP 7: Ongoing Maintenance
Continue ongoing maintenance of your system to ensure it continues to function properly for years to come. Avoid putting chemicals, oils or fats, or unnecessary solid materials into the system. Do not drive vehicles, plant large shrubs or trees, or build anything on top of your tank or leaching bed. Have your septic tank pumped and inspected every 3 to 5 years. Refer to resources from Algoma Public Health for more information on maintaining your system.
If you require more information about sewage system design, please visit our website at www.algomapublichealth.com. If you still have difficulty with the process you may wish to contact a sewage system installer who is qualified to design your system. Qualified designers and installers in the Algoma area are listed on our website.
Please note that these forms are not intended to be a comprehensive interpretation of the OBC design standards, but simply an aid for common installations. If you have any further questions about design or construction it is recommended you contact a licensed Designer or Installer.
| Minimum Horizontal Distance in Metres From: | |||||
| Structure |
A well with a water tight casing to a depth of at least 6 metres (Drilled Well) |
Any other Well | Any of: a lake, river, pond, stream, reservoir, or a spring not used as a sources of potable water | A property line | |
|
Treatment Units (Including Septic Tanks) |
1.5 |
15 | 30 | 15 | 3 |
|
Distribution Piping
|
5 |
10 | 15 | 10 | 3 |
*Please check with the municipality governing the locations you are installing the system in to see if there are increased clearance distances in place - if so, the greater distance must be followed.
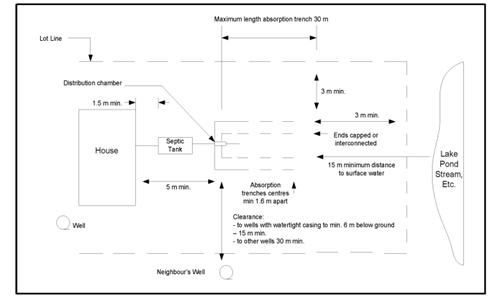
Typical Class 4 Layout With Clearance Distances
Date of Creation: June 1, 2015
Last Modified: June 1, 2015